Want to fix Google Drive not syncing on Windows 10? Scroll below and follow some steps.
Fix Google Drive not Syncing on Windows 10
Use the following methods to fix the issue.
Method 1: Pause the Syncing
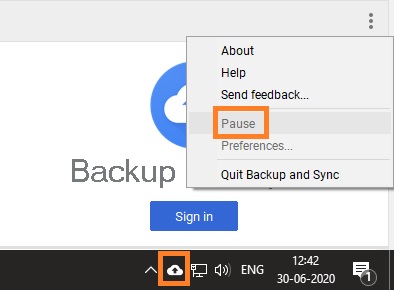
Step 1: Click on the System Tray.
Step 2: Find the Drive’s icon.
Step 3: Right-click on it to reveal the hidden options.
Step 4: Tap on the Menu and select Pause.
Step 5: Restart your Windows 10 computer.
Step 6: Click on the System tray and resume the syncing.
Step 7: You’ll now see that your files have started to sync.
Method 2: Restart Backup and Sync
Step 1: Click on the System tray and look for Drive’s icon.
Step 2: Tap on Quit Backup and Sync option.
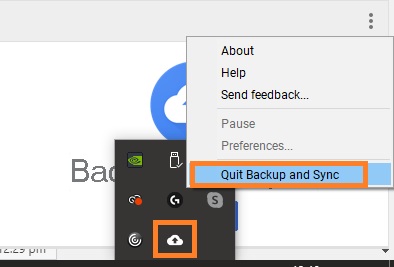
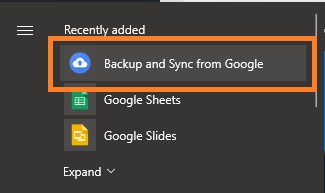
Step 3: To restart the process, search for Drive in Windows search.
Step 4: You’ll now see the icon in the system tray.
Step 5: Click on Drive. The syncing should be resume in a few minutes.
Method 3: Choose the accurate account
You might be using a few Google accounts. So, make sure you use the correct one.
- Click on the System tray.
- Click on Backup and Sync to view your current Gmail ID.
Method 4: Sync folder settings
This method is useful when you have many folders but not all are synced.
Step 1: Click on the System tray.
Step 2: Select Backup and Sync icon.
Step 3: Tap on Preferences.
Step 4: Now, select Google Drive on the left side.
Step 5: Ensure that ‘Sync My Drive to this computer’ and ‘Sync everything in My Drive’ are checked.
Step 6: Tap on OK when you are done.
Step 7: Select ‘Sync only these folders’ to ensure that the folder that isn’t syncing – is check here.
Method 5: File size/name length
Google Drive comes with a free storage space of 15GB. Check whether or not you have enough storage.
- Select the System tray.
- Click on Backup and Sync.
- Here you can check the available storage.
- Moreover, if you name your file more than 255 characters, there might be a syncing issue. Windows doesn’t allow files or folders with the said number.
Method 6: Tweak Proxy Settings
Proxy network can mess up Drive’s sync.
Step 1: Click on the System tray.
Step 2: Select Backup and Sync icon
Step 3: Choose Preferences.
Step 4: Now tap on Settings located on the left.
Step 5: Click on Network Settings.
Step 6: You’ll see Proxy Settings. Under that, tap on Direct connection.
Under Proxy settings, click on Direct connection and click on OK to save settings. This will tell Google to bypass proxy settings.
Step 7: Click on OK to save it.
Step 8: This is Google’s signal to override the proxy settings.
Step 9: If you still wish to use proxy settings, choose amongst the official list provided by Google.
Method 8: Delete Desktop.INI File
Every time Google Drive fails to sync, it keeps a record of it in a file type called desktop.ini. It is hidden but we can unhide and delete it.

Step 1: Launch the Windows Explorer.
Step 2: Go to the folder which Drive isn’t syncing.
Step 3: Select Options under the View tab to view hidden files.
Step 4: Now click on the Change folder and search options.
Step 5: Navigate to the View tab on the top.
Step 6: Click on Show hidden files, folders, and drives.
Step 7: Select Save.
Step 8: Go to the folder and if the dektop.ini file is visible, delete it.
Conclusion
Use the above methods to fix Google Drive not syncing on Windows 10.
RELATED

